


When it comes to the particle size analysis world, accuracy and consistency are everything. If you are dealing with particles in your company’s process, then your quality control process is dependent on your particle size analysis.
By definition, sieve analysis is the practice or procedure used to assess the particle size distribution of any granular material using a series of sieves that have different opening sizes. This could be done using singular test sieves or done on a Sieve Shaker like the RO-TAP®. The material is weighed on each sieve and analyzed as a fraction of the whole mass.
Typically, Test Sieve analysis is used to test dry material, but sometimes your material is too difficult for dry sieving and can’t produce the results you need. In these situations, wet sieving is an ideal alternative.
Particles can be unpredictable. They can clump together, causing some particles to seem larger than they are, which will give you inaccurate results after your sieve analysis.
Static can also be a problem if your particles are fine. Each particle can have trouble making their way through the openings in your sieve when they are stuck to each other or the sieve itself.
We wrote this article to dive into the steps and options you have when it comes to wet sieve analysis instead of standard dry sieve analysis.
Wet sieving can only be done on material that is:
- Insoluble in water
- Not affected by water: for example solids that expand won’t work
- Remain unchanged in temperatures up to 230°F (110°C)
Typical Applications for Wet Sieving:
- Agricultural soil with a high clay content
- Contaminated soil
- Clay suspensions
- River Sediments
- Sludge and Glazes
- Abrasives
- Kaolin and fillers
- Micro granulations
What is Wet Sieving?
When you are wet sieving for particle analysis purposes, your goal is to dry and weigh the material that is left on your sieve and calculate the fraction of your entire sample that it represents.
Wet sieving uses water to help separate and sieve particles that are clumping or sticking together. Mixing water with the sample helps the particles to separate while also removing any static in the sample so that the material can pass through the openings accurately.
Once the sample is through the sieves, it is dried and analyzed.
Different Types of Wet Sieve Analysis
There are two different ways to use wet sieving during your particle size analysis: a wet sieve analysis done by hand and a wet sieve analysis done with a RO-TAP Sieve Shaker. We are going to look at both methods of wet sieve analysis in this article.
A Wet Test Sieve Analysis by Hand to Separate Your Particles
This type of analysis is done when you are using a singular test sieve, not in a stack inside a sieve shaker. We sell specialized wet testing sieves that have high sides to them. This allows water to be mixed into the sample and moved around without losing any of your sample.
This type of analysis is usually only done to wash off the fine particles from your sample before running a regular dry RO-TAP analysis.
This process is known as a Wet and Dry Sieving Analysis.
Steps to performing a wet sieve analysis by hand with a wet wash sieve:
1.Dry your sample to a constant weight and weigh to the nearest .1 gram
If your sample readily mixes with water:
- Place the sample on the finest test sieve and wash it back and forth with a gentle stream from a hose (be sure there is no loss of your sample)
- The entire sieve containing the wet material should be dried in an oven if possible. It is vital that the temperature does not exceed 230°F (110°C)
- Once the material is thoroughly dried, the material should be weighed and repeated on the next coarser sieve **Dry time will be dependent on the characteristics of the material and should be established by a series of weight checks at intervals until no significant change occurs)
- Weigh your sample and analyze
If your material does not mix well with water
- Place your already weighed out sample into a quart jar. Fill the jar with about three-quarters full of water.
- Shake the jar vigorously to thoroughly mix the particles with the water. This mixture is then poured onto the sieve, and the washing process continues as described in step 3. **Your jar should be rinsed out more than once.
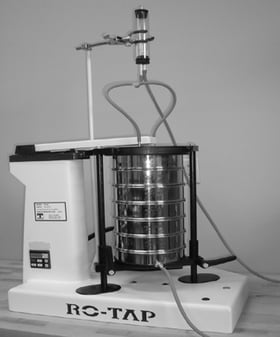
Wet Sieve Analysis Using a RO-TAP Sieve Shaker Machine
Wet Sieve analysis can be accomplished on a RO-TAP Sieve Shaker using the wet sieving kit that W.S. Tyler offers. This kit will allow you to perform a sieve analysis on a RO-TAP RX-29 using water. You can then run your sample down through the stack of sieves using the machine like normal, with the addition of water through the added tube.
Before you can run a wet sieve analysis using the RO-TAP Sieve shaker, you will need to assemble the wet test sieve kit on the RX-29 RO-TAP.
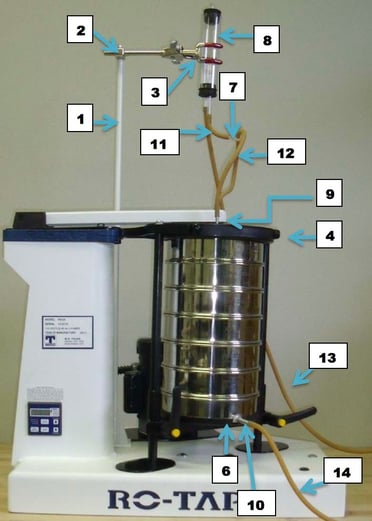
How To Assemble your Wet Test Sieving Kit on Your RO-TAP
1. Remove Standard Issue Sieve Support Plate and replace with Modified Sieve Support plate and bottom pan with spout (Parts 6 and 10)
2. Flow Meter Stand (Part 1) should be bolted to either the shaker base or beside the shaker on the table.
3. Fasten the 90 Angle Connector (Part 2) to the top of the Stand (Part 1)
4. Secure the Three Prong Clamp (Part 3) into the open slot on 90 Angle Connector (Part 2) and position over the sieve stack.
5. Insert the Flow Meter Assembly (Part 8) into the Three Prong Clamp (Part 3) and tighten it until it has been secured. The single tube should be facing the top for airflow.
6. Use the 3” piece of the rubber tube (Part 11) and attach it to the lower outlet in the Flow Meter Assembly (Part 8). The “T” Connector (Part 7) should be attached to the lower end of the short rubber tube.
7. Attach a 12” section (Part 12) to both open ends of the “T” Connector (Part 7)
8. The Longest Rubber tube (Part 13) attaches over the end of the higher Flow Meter Assembly outlet (Part 8)
9. Place the sieve stack in the shaker on top of the bottom pan (Part 10). Attach Outlet tube (Part 14) to steel tube on bottom pan.
10. Place Sieve Cover with Inlets (Part 9) on top of the sieve stack.
11. Place Modified Sieve Cover (Part 4) over Sieve Cover Inlets (Part 9) and secure stack in the shaker.
12. Attach 12” tubes (Part 12) to the corresponding steel inlet tubes (Part 9) protruding through Modified Cover (Part 4)
13. Introduce water through Part 13, Inlet Rubber Tube. Fill Flow Meter Assembly (part 8) ¾ full. This level should be maintained through the duration of the test. Set the timer and begin operation.
How to Use the RO-TAP Sieve Shaker with a Wet Testing Kit:
1) Reduce Sample to small test sieve size sample
a. Generally, this means the amount that will fit in an 8” full-height collection pan for
aggregate samples
b. If the material is wet in a 5-gallon pail, cone and quarter the sample to a
manageable size. You may have to do this multiple times. If the material is dry and
in a 5-gallon pail, use a 16:1 reducer or similar
c. Use a small tabletop/laboratory sample splitter to get the testing sample to the
recommended size
2) Weigh the wet sample. Record the weight.
3) Dry the sample. Record the weight.
a. 2 – 2-1/2 hours minimum in drying oven at 230°F (110°C)
b. Note the difference. This indicates the percentage of water weight to the actual
sample material.
4) Assemble the wet test kit on a conventional RX-29 RO-TAP® as the instructions indicate.
5) Add the appropriate test sieves and wet assembly pan to the RO-TAP.
6) Deposit the dried sample material on the top test sieve.
7) Turn on the RO-TAP and water source.
8) Test run time will vary
a. 15 – 20 minutes should be sufficient.
b. Allow water to drip/drain out
9) Carefully remove the sieve stack and pan.
a. Dry each test sieve and any material retained in the pan.
b. The recommended drying time is one hour at 230°F (110°C)
10) Carefully weigh the material retained on each dried sieve & pan.
11) Enter the retained material weight on the W.S. Tyler sieve analysis spreadsheet.
12) Add together all the retained material from each test sieve and pan.
13) Note the difference between steps #3 and #12.
a. This difference is the fines material that was carried by the water to a retention
bucket or down the drain.

To Sum It All Up
We have covered the basics of how to do a wet sieving analysis in this article. The main thing to remember is that particle size testing is all about consistency and accuracy. It is imperative to follow the same steps every single time to achieve the results you need for your quality control process.
We know that test sieves can get very technical and pretty specific, depending on your exact needs. If you have any other questions about which method is right for you or need help with your current processes, don't hesitate to contact our team.
If you are ready to order your test sieves, you can go to our test sieves part tool that will let you select and send your order directly to our team online.
Want all the latest industry trends and innovations sent directly to your inbox? Subscribe to our monthly newsletters today!