


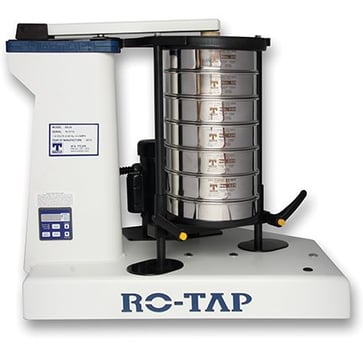
Since the 1930's, the W.S. Tyler RO-TAP® Sieve Shaker has been at the forefront of particle size analysis and is recognized as a reliable device all over the globe. Each device is made up of several different parts and pieces that all work in unison to give you consistent results.
That said, if you are someone who uses a RO-TAP Sieve Shaker, you know that some maintenance is required.
With over 150 years of particle size analysis experience, W.S. Tyler is here to ensure you're equipment remains operational for years to come.
With that, this article will provide guidance on how to replace six of the most commonly replaced parts on the RO-TAP.
These parts include:
- The Upper Eccentric Disc
- The Upper Carrying Plate
- The Lower Eccentric Disc
- The Timing Belt (Tension)
- The Hammer Block Assembly
- The Hammer
Looking for instructions on a part not listed here? Check out our updated article below for a step-by-step guide on how to install every part from the RO-TAP maintenance kit:
Why Do I Need to Replace Parts?
Like its name, RO-TAP, the machine rotates while a hammer taps on the sieve stack. This movement is what helps the particles being sieved move through the sieve stack. However, when this much movement is involved with metal bearings and parts, there is going to be some wear and tear over time.
 Sieve shakers are very durable machines. In fact, we get calls from people that have purchased our machines several decades ago and are still using them today.
Now, just because they last a long time, doesn’t mean that they won’t need maintenance or require upkeep.
We like to say that during the first year of using a brand new RO-TAP, you shouldn’t need to change out any parts. You may need to apply oil on the parts that are rubbing together, but everything should work smoothly.
After a prolonged period of use, you may begin to see some of the major parts starting to wear.
The frequency in which maintenance is required also depends on what materials are being sieved. With that, if you are running tests all day in your lab, you may find that your machine wears faster than someone who is only running 1-2 tests a week.
Most RO-TAP parts are easily replaced when following simple instructions. This allows you to minimize downtime and handle maintenance issues in-house.
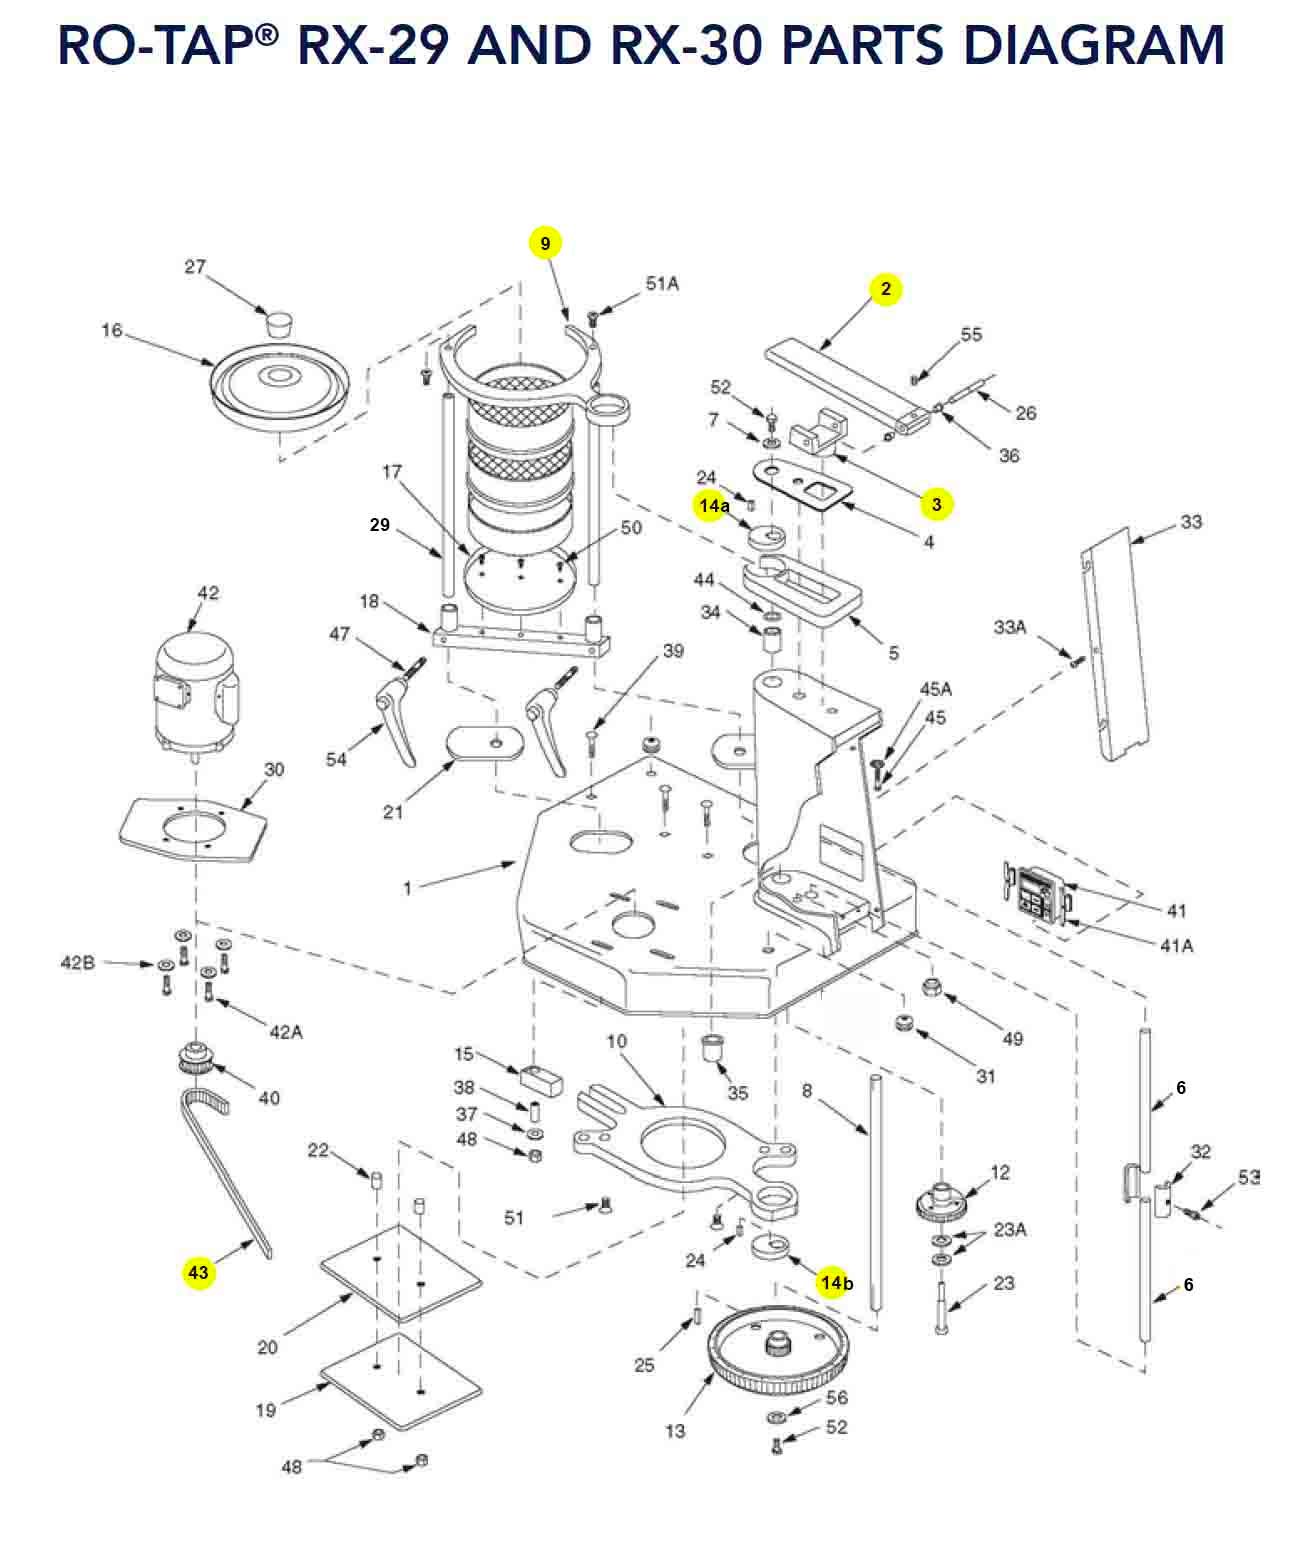
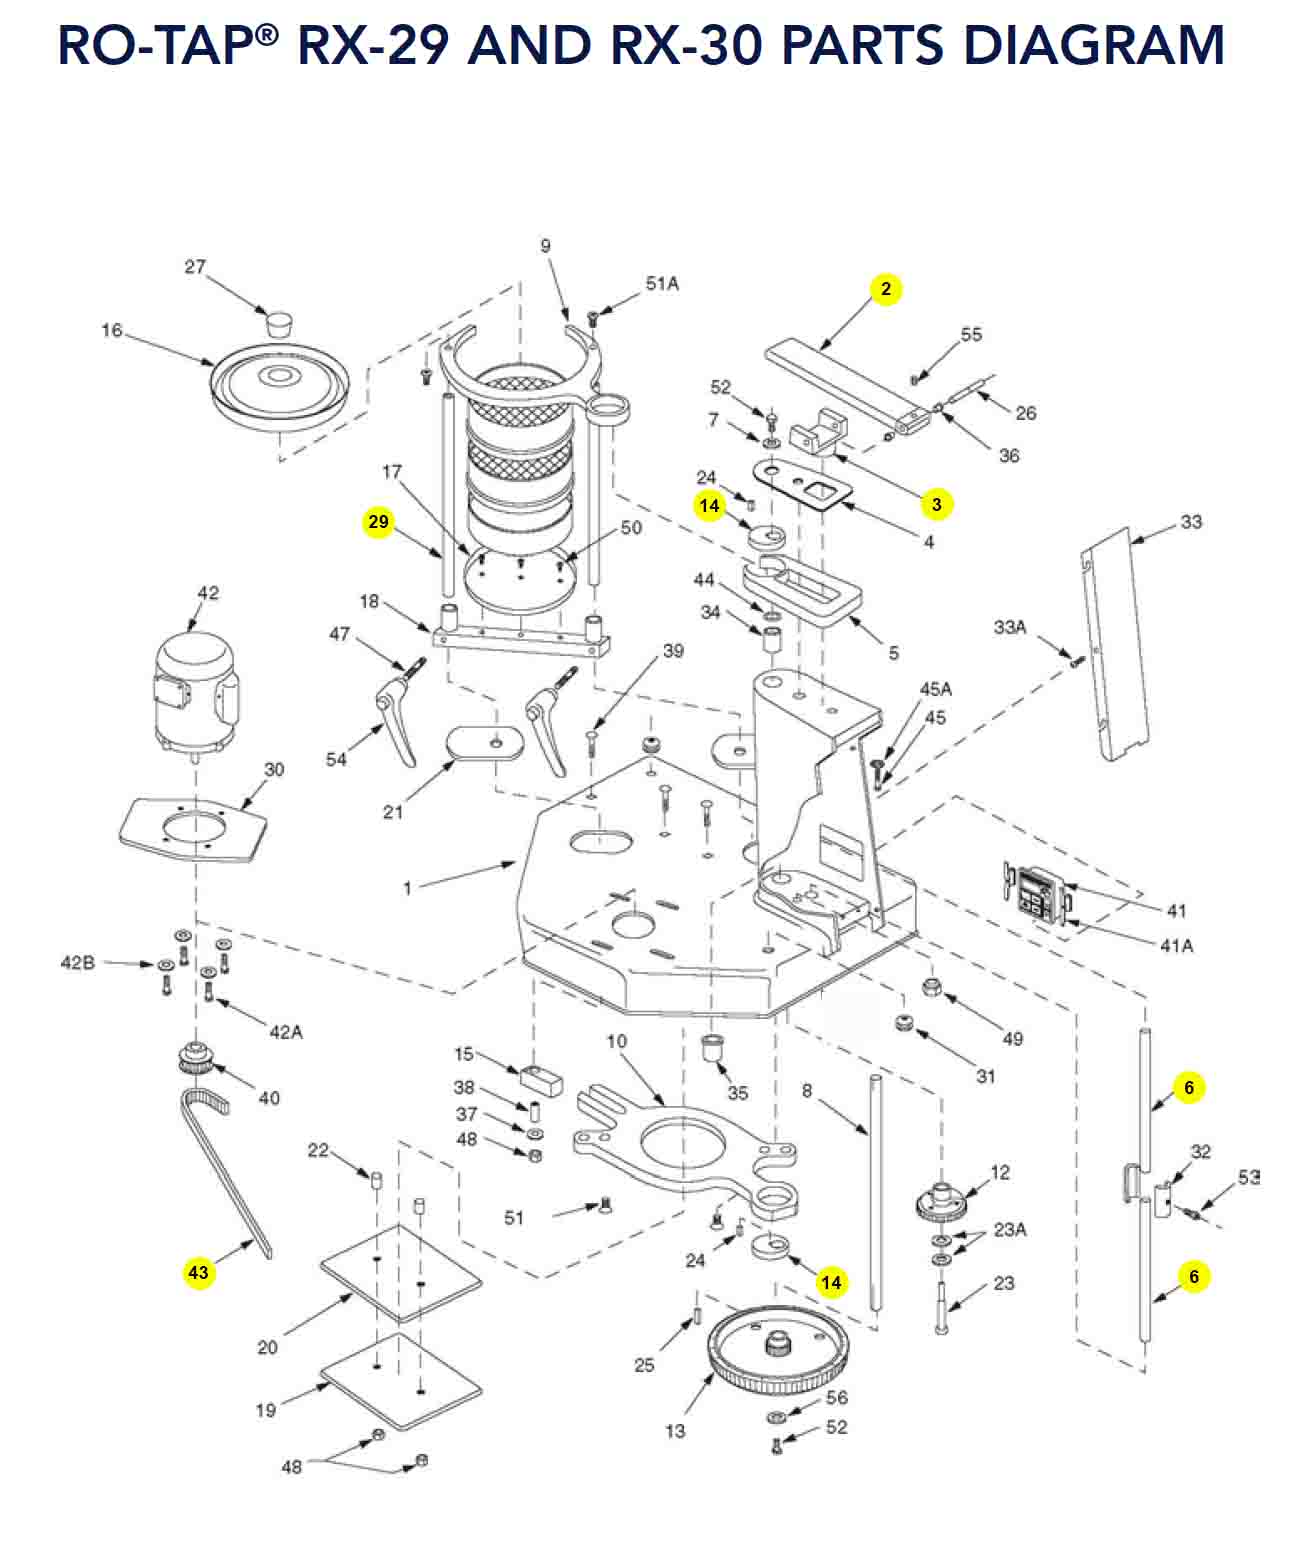
#14a Upper Eccentric Disc
To Replace:
-
Unplug the machine and remove any sieves or loose items.
-
Remove the Pedestal Cover (33) from the side of the tower.
-
Remove the Hammer (2) and Hammer Block Assembly (3) by removing the bolts (45 & 45a) located at the bottom of the Hammer Block and the inside of the tower.
-
Remove the bolt (52) at the top of the Main Shaft (8). It is located at the top of the tower near the inside edge.
-
Remove the Upper Main Shaft Washer (7), Sheet Guard (4), and Rotating Guard (5).
-
Remove the Eccentric Disc (14) from the Upper Carrying plate (9). Set aside the Eccentric Main Shaft Key (24).
-
Place the new Eccentric Disc into the hole in the Upper Carrying Plate and onto the Main Shaft.
-
Align and insert the Main Shaft Key into the keyway in the Eccentric Disc and down through the Main Shaft.
-
Reinstall the Rotating Guard, Sheet Guard, and the Upper Main Shaft Washer.
-
Tighten the Main Shaft with bolt 52. Note: If the Main Shaft has dropped during the replacement, this will put it back into place.
-
Reinstall the Hammer and Hammer Block Assembly, securing the bolt onto the bottom of the Upper Block inside of the tower.
#9 Upper Carrying Plate
To Replace:
-
Unplug the machine and remove any sieves or loose items.
-
Remove the Pedestal Cover (33) from the side of the tower.
-
Remove the Hammer (2) and Hammer Block Assembly (3) by removing the bolt (45 & 45a) from the bottom of the Hammer Block and the inside of the tower.
-
Remove the bolt (52) at the top of the Main Shaft (8). It is located at the top of the tower near the inside edge.
-
Remove the Upper Main Shaft Washer (7), Sheet Guard (4), and Rotating Guard (5).
-
Remove the Eccentric Disc (14) from the Upper Carrying Plate (9). Set aside the Eccentric Main Shaft Key (24).
-
Remove the two bolts (51a) securing the Upper Carrying Plate to the Tie Rods (29).
-
Replace the worn Upper Carrying Plate with the new one and secure it back onto the Tie Rods by tightening the two bolts.
-
Place the Eccentric Disc into the hole of the new Upper Carrying Plate and onto the Main Shaft.
-
Align and insert the Main Shaft Key into the keyway in the Eccentric Disc and down through the Main Shaft.
-
Reinstall the Rotating Guard, Sheet Guard, and the Upper Main Shaft Washer.
-
Tighten the Main Shaft with bolt (52).
-
Reinstall the Hammer and Hammer Block Assembly, securing the bolt onto the bottom of the Upper Block inside of the tower.

#14b Lower Eccentric Disc Replacement
To Replace:
-
Place the RO-TAP on its side to gain access to the bottom of the machine.
-
Loosen, but do not remove, the four bolts (42a) holding the Motor (42) in place.
-
Slide the motor to allow slack in the Timing Belt (43).
-
Remove the bolt (52) and washer (56) at the bottom of the Main Shaft (8).
-
Pull the Timing Belt Pulley (13) and the Lower Main Shaft Key (25) from the Main Shaft.
-
Remove the Eccentric Main Shaft Key (24) and Eccentric Disc (14) from the Lower Carrying Plate (10) and Main Shaft.
-
Slide the new Eccentric Disc onto the Main Shaft and place it in the hole of the Lower Carrying Plate.
-
Reinstall the Eccentric Main Shaft Key into the Eccentric Disc and Main Shaft keyway.
-
Carefully slide the Timing Belt Pulley back onto the main shaft, ensuring the inner teeth of the Timing Belt Pulley mesh with the teeth on the Cam Gear (12).
-
Reinstall the Lower Main Shaft Key into the keyway on the Timing Belt Pulley and the Main Shaft.
-
Tighten the washer and bolt back onto the bottom of the Main Shaft.
-
Reinstall the Timing Belt, push the motor back into position, and tighten the 4 bolts to secure the motor.
#43 Checking the Timing Belt Tensioning
The Timing Belt should fit snugly, neither too tight nor too loose, when installed. The positive Grip of the belt eliminates the need for high initial tension. Consequently, a snug fit assures longer life, less bearing wear, and quieter operation.

Preloading is not necessary. When torque is unusually high, a loose belt may skip teeth on start-up. In such cases, the tension should be increased gradually until the satisfactory operation is achieved.
A good rule of thumb for the initial tension that should be applied during installation is as shown. The corresponding tensioning force in the RX-29 and RX-30 is 13.0 lb. per span.
Note: For the RX-29 and RX-30, the span length is about 9”. That said, the belt should be able to deflect about 1/8” when properly tensioned.
#3 Hammer Block
To Replace:
-
Remove the Pedestal Cover (33).
-
With a ½” socket or hand wrench, remove the Hex Head Screw (45) and Lock Washer (45a) located inside of the tower just below the Hammer Block Assembly (3).
-
Remove the small Set Screw (55) located on the top of the hammer with an Allen wrench.
-
Remove the Hammer Block Assembly and place it on a sturdy bench.
-
Using a punch, tap the Hammer Pin (26) out of the block.
-
Remove the Hammer (2) from the block.
-
Set the Hammer into a new Hammer Block and tap the Hammer Pin back into place.
-
Replace the small Set Screw in the Hammer and Hammer Block Assembly.
-
Replace the Hex Head Screw and Lock Washer inside the tower, securing the Hammer Block to the tower.
-
Replace and secure the Pedestal Cover.
Hammer Height Adjustment
If the RO-TAP hammer isn’t tapping properly, you should adjust the hammer height. Note: Prior to hammer adjustment, ensure the cork plug (27) is seated firmly in the Sieve Cover (16).
To Replace:
- Ensure that the top edge of the Sieve Cover is flush with Upper Carrying Plate (9). A stack of sieves must be used to achieve an optimal adjustment.
- Remove the Pedestal Cover (33).
- Turning the Hex Head Screw (52) clockwise, jog the machine until the Hammer (2) rises to its maximum height.
- Using a T-Square or scale, measure the height from the top of the cork plug to the bottom of the hammer.
- The operating height should be 1-5/16 +/- 1/16”. You can achieve this setting by loosening the screw (53) on Lift Rod Coupling (32) and adjusting the lift rods up or down.
- Once you have the distance between the cork and hammer at 1-5/16”, tighten the screw on the coupling to secure it.
- Replace the Pedestal Cover.
Keep Your RO-TAP Sieve Shaker Pristine
While the RO-TAP Sieve Shaker is widely known as a reliable particle size analysis instrument, there are some maintenance steps you will need to take to ensure it continues to operate as it should. When operating, all RO-TAPs will produce a noticeable amount of noise, so it's important to listen for specific noises or indicators that let you know a part is worn out or needs to be replaced.
If you are looking for more information on the RO-TAP, here are some resources that may be valuable to you:
- Why is my sieve shaker too noisy?
- Everything you need to know about the RO-TAP Sieve Shaker
Having worked in the particle size analysis industry for over 150 years, W.S. Tyler is here to guide you through any maintenance issues you may encounter when utilizing a RO-TAP. That said, following the steps listed above will help ensure your device remains in pristine condition.
If you are in need of replacement parts, please reach out to our customer service team
Want all the latest industry trends and innovations sent directly to your inbox? Subscribe to our monthly newsletters today.